Christmas Gingerbread cookies

I think Christmas is one of the very best times to bake, for me Christmas is not complete without the smell of gingerbread biscuits and cinnamon. That is why I baked a batch of gingerbread biscuits for each of my hampers.


Gingerbread Cookies
  •  1/2 cup brown sugar
  • 1/2 butter or margarine

Cream together, then add:
  • 1/2 tsp. salt
  • 1-1 1/2 tsp ground ginger (if you prefer a stronger ginger flavour just add a wee bit more)
  •  1 tsp. cinnamon
  • 1 cup fancy molasses ( i use either golden syrup or treacle at this point it's just the same!) 
  • Dissolve: 2 tsp. baking soda in 1/2 a cup of water
Stir into batter. Then add 4 cups of flour. Add enough flour so that gingerbread cookie dough is stiff enough to roll out. 
Roll onto floured counter until 1/4" thick and cut out with gingerbread men/Christmas cookie cutters.
Cut your cookies on the thick side. This makes for a softer cookie.
Bake at 160 for 10 minutes, reduce heat as needed so cookies don't over-brown. 
This recipe makes about 2 dozen gingerbread cookies maybe a little more.


To decorate I melted down a bar of good quality dark chocolate and used double cream to make sure it didn't stick to the pot. It made a very luxurious velvety chocolate mixture to dip the biscuits into. I laid them on baking parchment and then sprinkled with christmassy sprinkles, I used red, green and white non parelis and snowflake shaped sprinkles. Then put the whole lot into the fridge to harden before lifting off the paper and bagging up.


Hot Chocolate Cones

These were so fab and easy to make but looked absolutely brilliant. They went down a treat! 

What you will need:
  • Cone shaped cellophane bags 2 of (eBay is cheapest about £1.99 for a pack of 25)
  • Clear elastic bands - x2 (again eBay is best, about £2.50 for a bag with hundreds in)
  • A pair of scissors
  • Cocoa/Hot chocolate powder (depending how big you want the cone about 3/4 of a cup should do it)
  • Mini marshmallows (again use your own judgement here but a generous helping!)
  • Ribbon to decorate (optional)
  • Instructions/gift tag (optional)

What to do:
  1. Take your first cone cello bag and add your cocoa powder to it at the desired level.
  2. Tie the bag with a clear elastic band, then snip off the excess plastic (just above the elastic band and then tuck the raised bit into the middle of the cone to disguise it.
  3. Pop that cello bag inside the second cello bag 
  4. Throw in your mini marshmallows on top and then secure with a clear elastic band.

then you can make it look pretty!! so quick and easy and look great!

Finished product looking pretty - red bows were from The Range.


I made the tags myself


The tag

Lovely Limoncello

The next item I decided to make for my hampers was Limoncello (An Italian liqueur made from vodka and lemon zest). It wouldn't be Christmas without a little tipple now would it?!!
Recipe I used is here
I bought my bottles from Tesco (cheap soy sauce - decanted the soy sauce into a bigger bottle, cleaned the bottles out and then washed them in the dishwasher and sterilised them in the oven before filling)
Vodka with the lemon zest - infusing!


The finished product!


Cranberry & Apple Chutney

For Christmas I decided to do something a little bit different and a little bit special and make my own Hampers.


The first item I decided to make was a chutney, for this I turned to Nigella's Christmas book and found a recipe for Cranberry & Apple chutney - perfect & christmassy! Also really easy to do! It's definitely not just an old woman thing! Us mere 30 yr olds can have a bash too! (least that's what I'll keep telling myself lol)


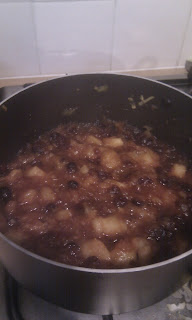
Just bung all the ingredients in the pan and away we go!


Just starting to sweat down a bit now and take on the signature chutney colour!
Here it is all ready for potting in my sterilised jars. 
Jars are from ikea £1.89 for pack of 4 very good value and they look pretty too! 

To sterilize the jars I just washed them in the dishwasher and then put in the oven to dry at 140 I think it was, note: don't put the lids in the oven if you get these jars from Ikea it's a plastic lid  not metal - I learnt the hard way! :-)


All potted up in jars

I bought a "fat square" of Christmas material from eBay to put on top of my lids to make them look a bit more festive!


Here they are all finished and labelled up.
I added a bit of gold metallic curling ribbon before putting them into my gift baskets

Spooky Cupcakes & Biscuits for Halloween

Instead of the usual buying in loads of fun size chocolate bars and sweets for my trick or treaters I decided to do some baking instead. They seemed to go down well with the local kids....


I used a basic cupcake recipe and a basic biscuit recipe. Halloween cupcake cases and cookie cutters were from Asda. The picks I downloaded, but now can't find the site I found them on, but if you want them just drop me a message and I can email you the pdf files to use. You just have to print them cut them out and use cocktail sticks to stick them into the cakes with.

The third BIG baking project - My Daughter's 1st Birthday cake!


I was more excited about this day than she was by FAR!! I had planned it for months.  On her actual birthday we would go get her professional photos taken at Pixi Photo in the morning, go somewhere nice for lunch (not too nice she's still getting used to proper food). Then in the afternoon we went to the Yorkshire Wildlife Park. A lovely fun family day it was too.  Then we had her 1st birthday party at the weekend and so of course I made cake!....


Special Agent Oso the likeness is uncanny!
It had to be a number 1 shaped cake for her first birthday. Which I found a real pain to source. eBay was the only way! Ordinary Victoria sponge mix and covered with white sugar paste.  Hubby made the Special Agent Oso cake topper.
Out of the cake mould, cooled and ready for jam and butter-cream frosting


The finished article

A Giant Cupcake you say.. oh go on then...

Recipe from here

I decided to use up the rest of the Oreo biscuits I bought and use them to add to my butter-cream frosting for the middle of the giant cupcake.

For a first attempt with my giant cupcake silicone mould from Wilkinson (only £6) I didn't think it was too bad! I took it in to work and it was gone by midday! Praise indeed.


Straight out of the mould with no decoration

Piped on I promise, but it was soooo messy I decided to make it a bit tidier with a spatula


Oreo cookie butter-cream filling.

Just for fun baking ... Oreo Cookie Cupcakes

One of Lorraine Pascale's recipes I just felt like baking one day and so I whipped up a batch of these....


The second baking project...

July 2011


Was a 3 tier cake for my Daughters' Christening. Brave or stupid to go from having never baked more than 2 cakes before in my life to doing 3 all pretty much at once!!


Sooo, I made a cake plan and didn't just go into it blind! I purchased a set of square baking tins from a store on eBay which was much cheaper than anything on the high street.

This was my plan:

Bottom tier – 11.5 inches, 3.5 inches tall, fruit cake – Pink Icing, 2kg marzipan needed and 2kg pink icing
Middle Tier – 10.5 inches, 3 inches tall, madeira sponge – White Icing, 1.5kg white icing
Top Tier – 9.5 inches, 3 inches tall, Red Velvet – Pink Icing, 1.5kg pink icing
Sugarpaste/icing
Total Marzipan required: 2.5kg - ASDA
Total Pink Sugarpaste required: 4kg – CAKESTUFF
Total White Sugarpaste required: 2kg - CAKESTUFF
btw, to work out how much sugar paste I needed I found this extremely helpful chart http://cakestuff.bpweb.net/cake-covering-guide-c-33.html
Cake Boards & Boxes
14” Cake board
14” Cake Box
12” Cake Box
11” Cake Box
Dowells/Supports
4 x 3.5” dowels for each cake 12 dowels and 1, 11” dowel to go through all tiers to secure in place.

So I made the bottom and biggest tier first, which was the fruit cake. I decided on fruit cake mainly to give the rest of the cake support as I thought the other 2 tiers wouldn't sink into it as fruit cakes are usually pretty dense and stable! 

( I used the same fruit cake recipe as i used for my friends Hen Day cake as it went down well)

This is it before being baked:

This took ages to cook

To make sure it didn't burn on the outside before it cooked inside I tied baking parchment around the tin and also on top with a small hole cut out


This is it when it came out of the oven:


I let it cool completely and then I covered the cake in marzipan:


I then left the cake to dry out and harden before covering it with the pink sugarpaste:


That was the bottom tier done, next onto the middle tier. This was the good old plain Madeira sponge cake:


 Whilst that one was cooling I got straight onto baking my top and final tier, the red velvet cake ( I used Lorraine Pascale's recipe http://www.bbc.co.uk/food/recipes/three-tier_red_velvet_17795


 I was really quite disappointed when this cake came out the oven as it wasn't at all the red colour I thought it would be - I decided that next time I would invest in some gel/paste colouring rather than the liquid stuff.


All 3 cakes were baked and needed covering with sugarpaste 


I assembled it which was not the easiest of things and put in the support dowels.

This is what the finished article looked like:


Cake topper from eBay store  - lady that hand crafts them


This is it on the table at the christening tea:


I was very proud of myself and all the guests that attended complimented me on it which was just awesome!


The first baking project I ever did......

May 2011:


Not one to do things by halves and having only ever baked a cake once before I set myself a task of baking my friend Jemma a cake for her Hen day. 


I used a fruit cake recipe which I will find the link for and post up for you later.  I was then mystified by the whole concept of marzipan and fondant layering but managed with some success and began to decorate the cake! 


This was the finished article:


Newbie to the world of Blogging.....

I would like to say a Hello! to all who might just stumble haphazardly across my page! Welcome!

Hopefully once I get the hang of this blogging malarkey you will all be able to see my wonderful (or maybe not) culinary delights.